
One of the best things about using ClickFunnels is you can create automated webinars and generate leads at the same time.
You just need to prepare your webinar content, automate your landing pages, and watch as your business gets more sales.
With automation, your webinar funnels work for you 24/7. Anyone can access your webinar on demand.
This is a great option since 1/3 of webinar attendees prefer watching an on-demand event.
In this article, we’ll focus on how to set up your next ClickFunnels evergreen webinar. And the best way to do that is by integrating your ClickFunnels Page Builder with AEvent.
AEvent is the only webinar automation tool you need for running your ClickFunnels Campaigns.
Schedule a demo with AEvent today to learn how our features can help increase your webinar attendance and engagement rates.
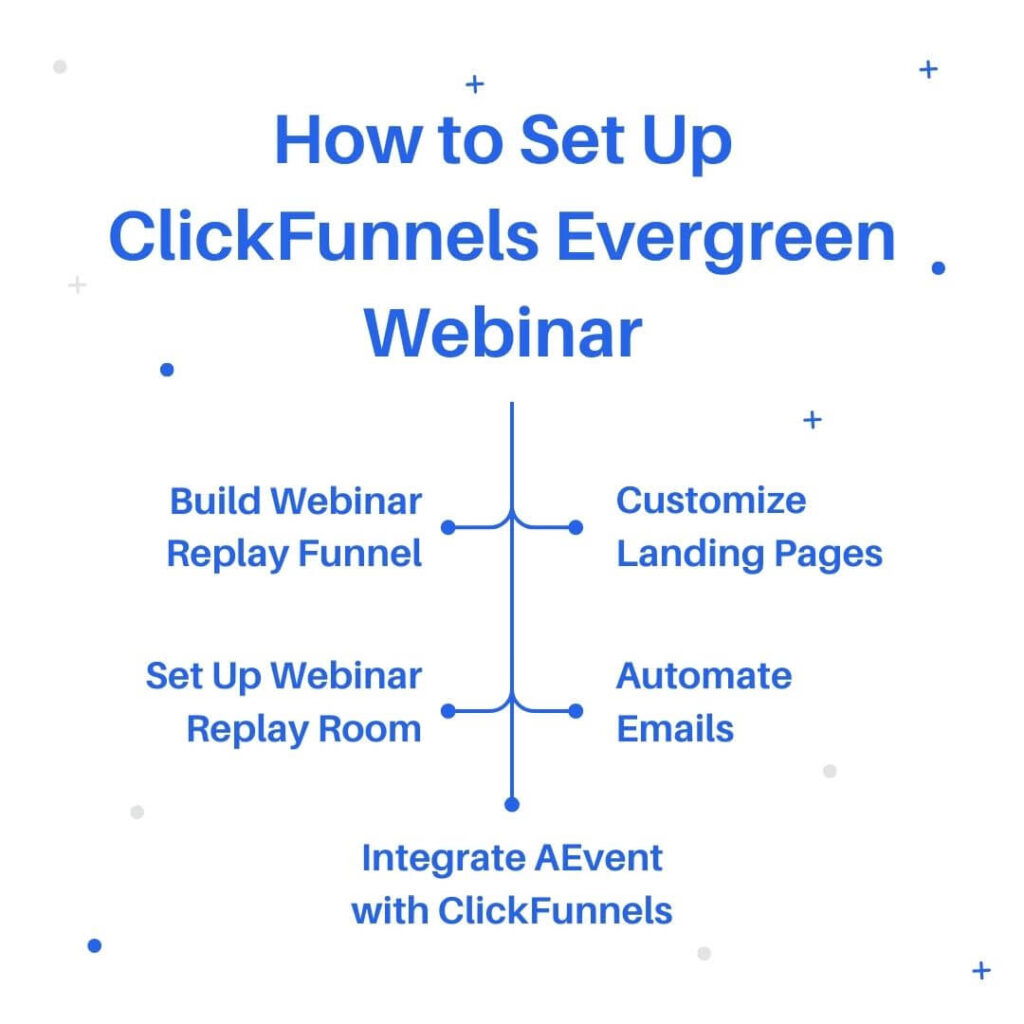
How to Set Up a ClickFunnels Evergreen Webinar
You can set up a ClickFunnels evergreen webinar by building a webinar replay funnel, customizing your landing pages, and embedding your video in the broadcast room.
But before all that, your pre-recorded webinar should be ready to go. Upload it on a third-party video hosting platform like YouTube or Vimeo.
Once you have your webinar content, follow these steps:
Step 1: Build Your Webinar Funnel
Open your ClickFunnels account and select the “Build a Funnel” feature. It will give you three options to choose from:
- Collect Emails
- Sell Your Product
- Host a Webinar
Pick the “Host a Webinar” option and select between a “Live Webinar” or a “Webinar Replay.”
To create an evergreen webinar funnel, select Webinar Replay.

Then, name your funnel and assign a group tag if you’re running multiple funnels.

A webinar replay is just like watching a regular video. Viewers can adjust the playback options depending on your chosen video hosting platform.
But unlike any regular video on your website, this will help increase sales each time a viewer visits your replay page.
Step 2: Customize the Landing Pages

Webinar landing pages go a long way in encouraging prospects to opt-in to your product or service.
It’s their first interaction with your brand before actually watching your webinar.
According to Hubspot, landing pages have a 23% higher signup rate compared to pop-ups and signup boxes.

With ClickFunnels, you’ll need to set up 4 types of landing pages:
- Webinar Registration Page
The webinar registration page is where potential clients can sign up for your upcoming evergreen webinar.
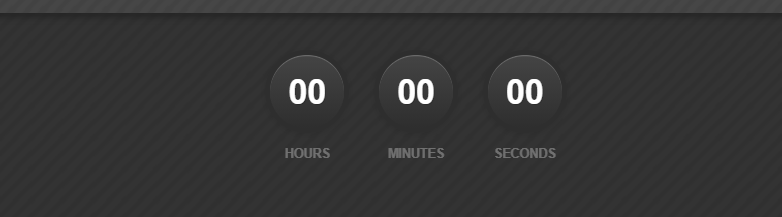
You can adjust the webinar date and time on this page. Input your local time and the countdown timer for your webinar.
This will help run your webinar around the clock.
- Webinar Confirmation and Thank You Page
This page serves as the viewer’s confirmation that they’ve signed up for your webinar.
You can also introduce bonus offers on this page for prospects to check out before joining the online event.
- Webinar Broadcast Page and Replay Page
The Webinar Broadcast Page and Replay Page host your webinar video so viewers can play it after signing up.
The broadcast page lets participants view your webinar as if it were “live” (even though it’s pre-recorded).
In the replay room, the content is presented as a recording of an earlier broadcast.
You need to set up both in your evergreen funnel since it affects your webinar automation sequence.
- Order Confirmation Page
If your webinar includes a sales pitch in the middle or at the end of your video, add an order form and order confirmation page to your funnel.
This makes the sales process a lot easier since viewers can jump from the replay page straight to your offer.
ClickFunnels has different templates for each page that you can choose from.
Make sure to update the pages with your logo and appropriate text. Include the date, time, and page paths to direct viewers to the correct landing page.
Step 3: Set Up the Webinar Replay Room
Once your landing pages have been customized, you need to set up your auto-webinar replay room.
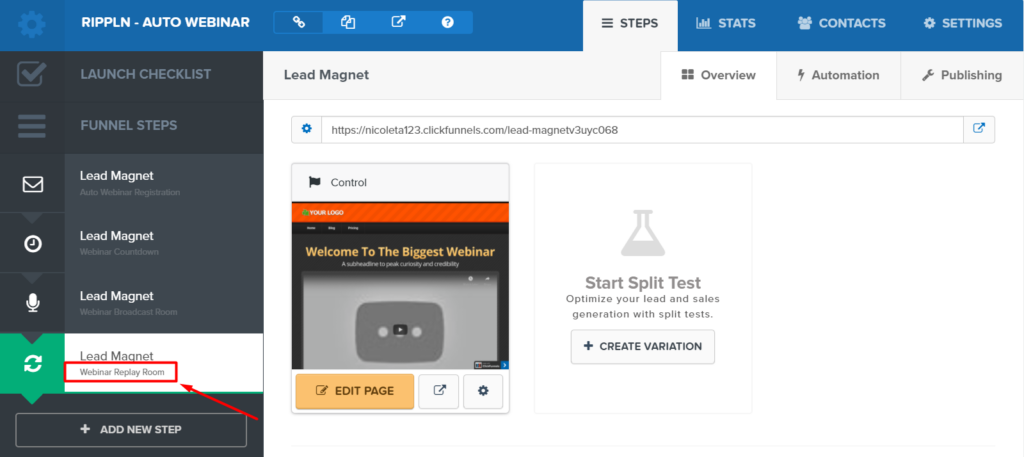
Configure the settings to display your offer at the right time during the webinar replay.
You can do this by adding a countdown timer or a button that appears when it’s time to present the offer.
To embed your pre-recorded webinar in the replay room, click on the video settings and select video type.
Choose the third-party platform where you uploaded your video.
ClickFunnels is compatible with YouTube, Vimeo, and Wistia. You can also choose a custom embed option or HTML5 video.
Copy the embed code from your video hosting platform and paste it into your ClickFunnels replay room.

Step 4: Automate Email Sequences
The next step is to create automated webinar email sequences that trigger based on different viewer actions during the webinar.
In ClickFunnels, you can automate emails for scenarios such as:
- Attended but Missed Offer: For viewers who attended the webinar but left before the offer was presented.
- Saw Offer but Didn’t Purchase: For viewers who saw the offer but did not complete a purchase.
- Missed Webinar: For registrants who did not attend the webinar at all.
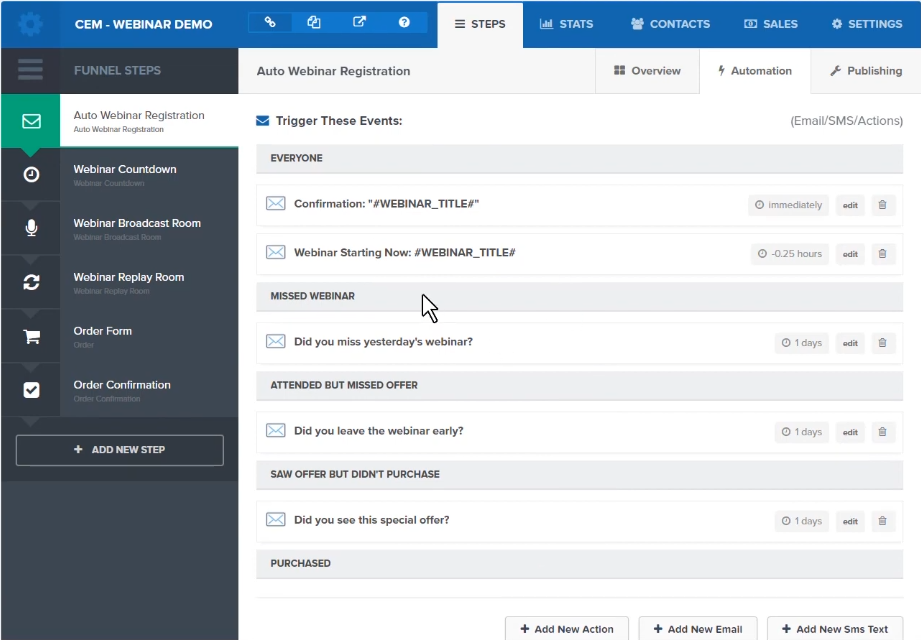
Include direct links back to the webinar replay room in each of your emails.
This encourages recipients to re-engage with the content, especially if they missed the webinar or left early.
It’s a way to guide them back into the funnel and purchase your offer.
Step 5: Integrate AEvent with the Webinar Replay Page
You can add another layer of automation to your ClickFunnels evergreen webinar by integrating it with AEvent.
With AEvent, you can create self-expiring ClickFunnels replay pages so only authorized users can access the content.
You can also customize the countdown timer and page elements.
All you need is to connect your AEvent timeline to the ClickFunnels replay page through a header script.
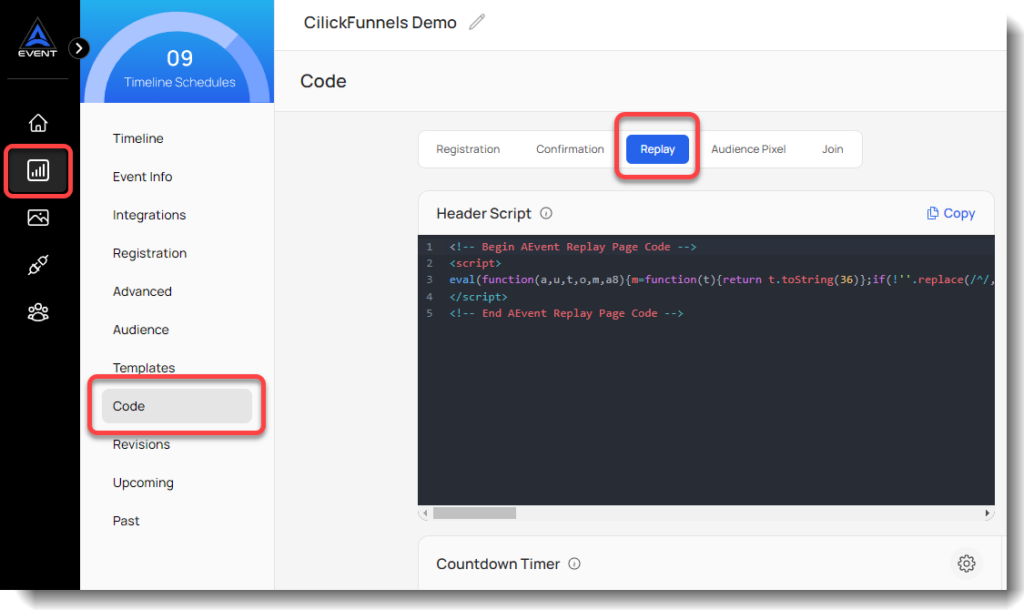
Copy the script and go to your ClickFunnels replay page. Paste the script on the Tracking Code and close to save.
Once you’ve applied the script and activated your webinar timeline on AEvent, your replay page will only be accessible to registered viewers.
The link to the replay page will expire after your set countdown timer.
A self-expiring webinar link adds urgency and fully automates your ClickFunnels evergreen webinar.
If you want the replay page to be available to viewers at any given time, you can deactivate the timeline.
AEvent Integrations with ClickFunnels Page Builder
Aside from your replay page, AEvent also integrates with other elements in your ClickFunnels Page Builder.
This means you can automate your entire ClickFunnels webinar campaign, from registration to order confirmation.
Registration Page Automation
Your registration form will collect the registrant’s name, email, phone number, and any additional custom fields.
This information will be passed into your AEvent account so you can use it in your marketing efforts.
AEvent’s integration also lets you add a multi-option dropdown menu for your ClickFunnels registration page.
Webinar attendees can choose from different timeslots to attend the event.
Giving viewers options can increase registrations and webinar show-up rates for your evergreen webinar.
Confirmation Page Automation
By integrating AEvent with your ClickFunnels confirmation page, attendees will receive a personalized join link after registration.
This makes it more convenient to access your event.
You can also include an “Add to Calendar” button for those who want to send an event notification to their 3rd-party calendars like Outlook, Google, or Yahoo.
ClickFunnels Additional Pages
AEvent also integrates with any other pages in your ClickFunnels campaign.
You can add personal dynamic page values, track visits, and create custom audience segments.

Dynamic page elements allow for greater personalization, like setting the webinar schedule in the viewer’s own timezone.
It’s an effective feature for increasing engagement rates given that 67% of consumers prefer brands that automatically adjust content based on their context.
Automating Your ClickFunnels Evergreen Webinar is Possible with AEvent
ClickFunnels is a powerful tool on its own. But with AEvent, your evergreen webinar will reach a higher level of automation.
You can connect AEvent to your registration page, confirmation page, and webinar replay room for a seamless viewer experience.
Viewers can watch your webinar on demand and get redirected to your offer all in one place.
With AEvent, you can run your online events on autopilot and double the results of your ClickFunnels marketing campaigns.