Webinars are an amazing tool for engaging with your audience, generating leads, and sharing valuable content. However, they can quickly become a logistical nightmare without the right tools.
That’s where HubSpot and AEvent come in. When integrated, these tools turn chaos into a well-oiled machine. Imagine automating reminders, follow-ups, and attendee tracking.
In this post, you’ll learn how to get started with integrating HubSpot and AEvent. Specifically, we’ll cover:
- How you can manage your contact lists effectively
- Automate workflows to keep your audience engaged, and
- Set up on-registration triggers that take the hassle out of the registration process
By the time we’re done, you’ll be equipped with practical steps and real-life use cases to make your webinar management as easy as pie.
Hosting your next webinar? Tap into AEvent’s powerful automation platform to maximize engagement and attendance. Plan your next event with confidence—schedule a demo with AEvent today and discover the difference!
Key Benefits of HubSpot and AEvent Integration
When you integrate HubSpot with AEvent, you gain access to a range of powerful features designed to make your webinar management seamless and efficient.
Expect to see significant improvements in how you handle data, automate tasks, and track performance. Here’s what you can look forward to with this integration:
- Centralized data management: No more juggling between platforms. With HubSpot and AEvent integrated, all your webinar data is in one place, making it easier to manage and analyze.
- Automated workflow capabilities: Say goodbye to manual tasks. Automate everything from sending reminders to following up with attendees, ensuring a smooth and professional webinar experience.
- Improved tracking and analytics: Get real-time insights into your webinar performance. Track registrations, attendance rates, and engagement metrics effortlessly. This data is invaluable for improving future webinars.
Quick Start Guide: Integrate HubSpot with AEvent
First things first, let’s get HubSpot and AEvent talking to each other. Here’s a simple guide to get you started:
- Logging into your AEvent account: Open your AEvent account. If you don’t have one, it’s quick and easy to sign up.
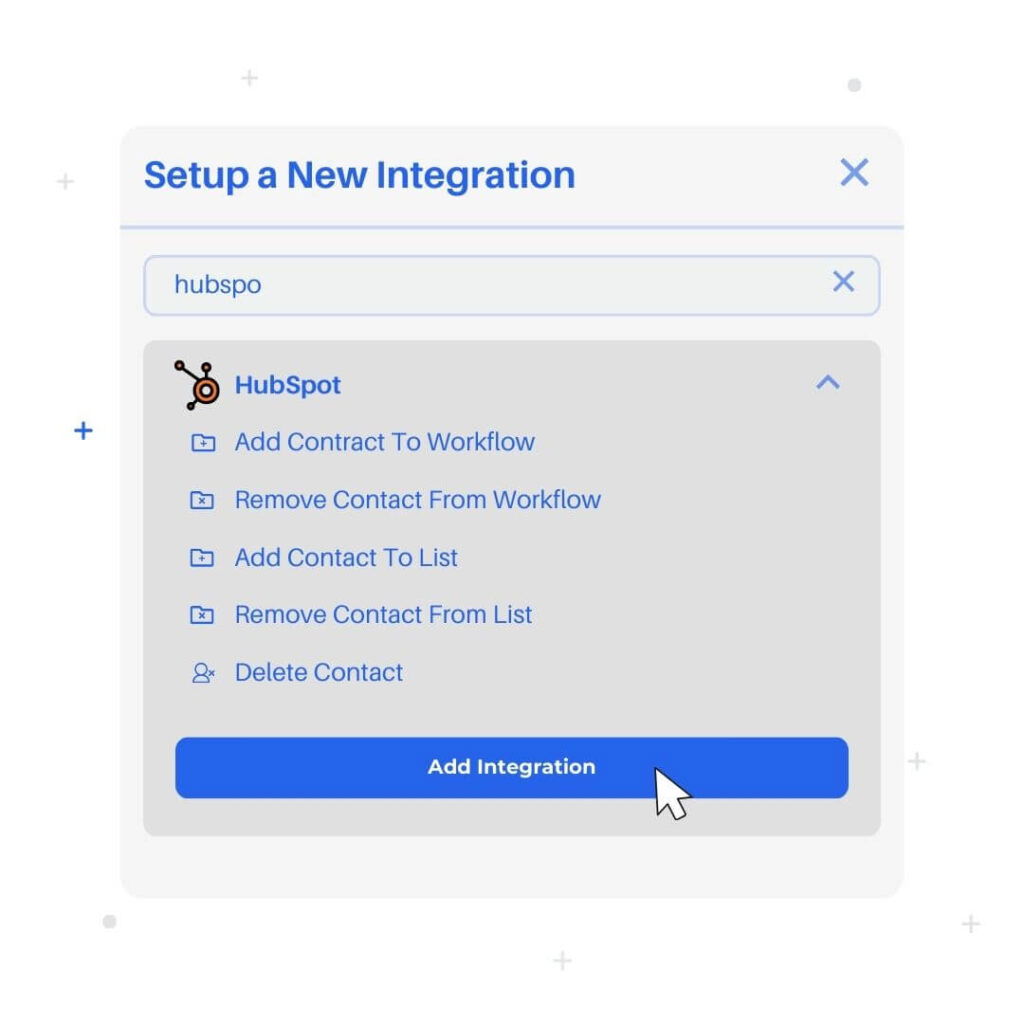
- Navigating to the Integrations section: Once logged in, head over to the Integrations section. You’ll find this in your account settings—usually tucked away in the top menu.
- Adding HubSpot integration: Click on “Add Integration” and type “HubSpot” in the search bar. Once it pops up, click “Add” to start the integration process.
- Authenticating with HubSpot credentials: You’ll need your HubSpot login details for this part. Enter your email, password, and any two-factor authentication codes. This step ensures that your accounts are securely connected.
- Testing the connection to ensure successful integration: Finally, test the connection. This step is crucial! Go back to the Integrations section, find HubSpot, and click “Test Connection.” If everything’s set up correctly, you’ll get a confirmation message.
Congrats! You’ve successfully integrated HubSpot with AEvent. Now, let’s look at the amazing things you can do in your next webinar with these powerful features.
Managing Contact Lists with AEvent and HubSpot
One of the key benefits of integrating HubSpot with AEvent is the ability to manage your contact lists more effectively.
With these tools working together, you can automate the process of adding, removing, and deleting contacts based on their webinar activity.
Watch our step-by-step tutorial on how to set up and optimize this integration:
Adding Contacts to a List Before the Webinar
Start by adding your registrants to a specific contact list before the webinar begins.
This ensures you can send out timely reminders, logistical details, and any preparatory materials to get them ready for the event.
Here’s how to set it up:
- Log into your AEvent account and navigate to the timeline of the upcoming webinar.
- Click on “Create Action” and select the option to add contacts to a list.
- Set this action to trigger one hour before the webinar starts.
- Choose the registrants and select the HubSpot list you want them added to.
- Confirm and save the action.
Removing Contacts From a List After the Webinar
Once the webinar is over, it’s important to update your contact lists to reflect attendance.
Removing attendees from the pre-webinar list and adding them to a follow-up list helps you send targeted thank-you emails, surveys, and additional resources.
Here’s the process:
- Go back to the webinar timeline in your AEvent account.
- Create a new action to remove contacts from a list.
- Set this action to trigger one hour after the webinar ends.
- Select the attendees and choose the list you want them removed from.
- Confirm and save the action.
Deleting Contacts or Subscribers Who Did Not Attend the Webinar
Keeping your contact lists clean and focused on engaged individuals is crucial.
Automatically deleting non-attendees helps improve the quality of your lead database.
Here’s how to do it:
- In your AEvent account, navigate to the webinar timeline.
- Create a new action to delete contacts.
- Set this action to trigger two hours after the webinar.
- Select the non-attendees and confirm the deletion.
- Save the action.
Use Cases for Managing Contact Lists
Managing your contact lists effectively is crucial for maximizing the impact of your webinars.
Leveraging HubSpot and AEvent allows you to automate key actions, ensuring your communications are timely and relevant.
Here are some practical use cases to help you get the most out of this integration:
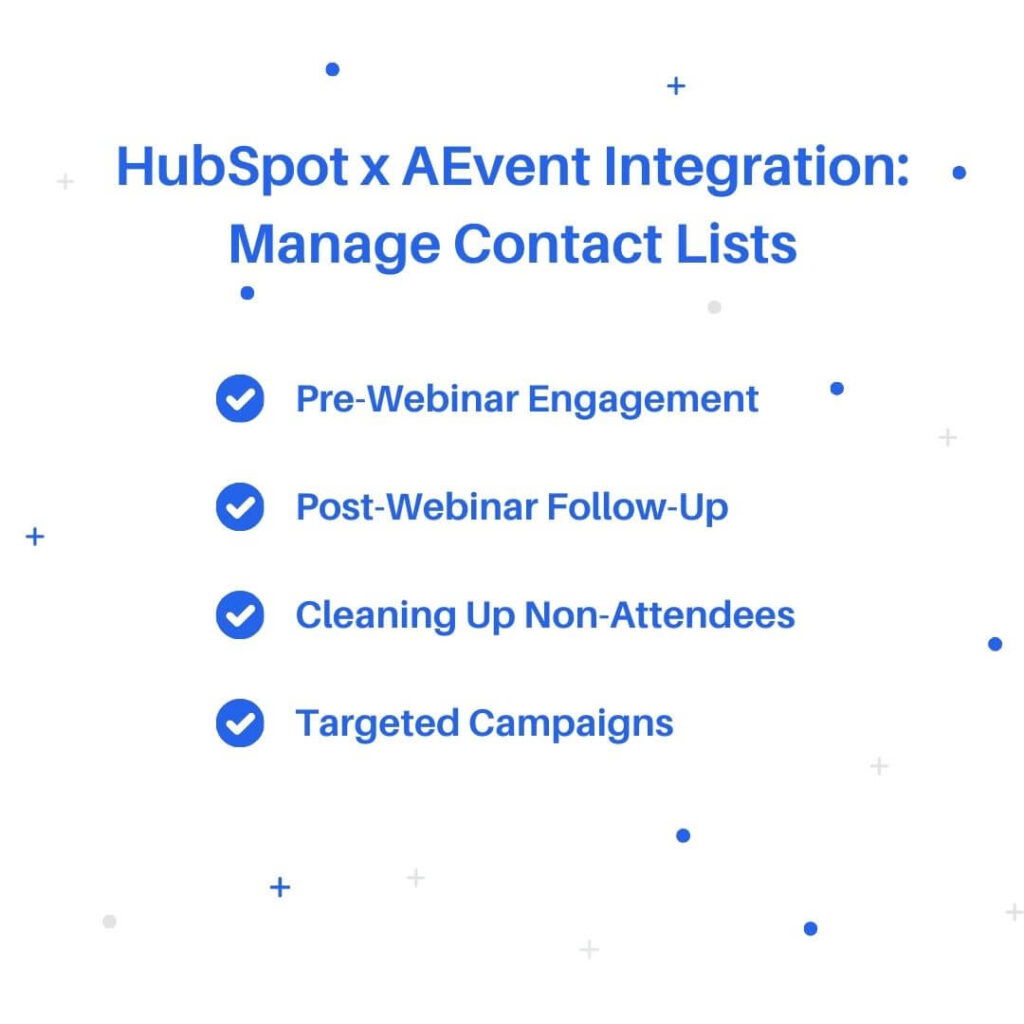
- Pre-Webinar Engagement: Adding registrants to a specific contact list one hour before the webinar allows you to send out timely reminders, logistical details, and preparatory materials. This ensures your attendees are ready and informed, increasing the likelihood of their participation.
- Post-Webinar Follow-Up: After the webinar, move your attendees from the pre-webinar list to a follow-up list. This enables you to send thank-you emails, surveys, and additional resources discussed during the event. It’s a great way to keep the engagement going and gather valuable feedback.
- Cleaning Up Non-Attendees: Automatically deleting non-attendees from your contact lists two hours after the webinar helps maintain a clean and focused lead database. This ensures you’re only targeting engaged contacts in your future marketing efforts, improving overall campaign effectiveness.
- Targeted Campaigns: Use your updated lists to segment contacts for future marketing campaigns. Invite previous attendees to new webinars or nurture non-attendees with different content to re-engage them. This targeted approach helps in creating more personalized and effective marketing strategies.
Automating Workflows for Webinar Attendees
With HubSpot and AEvent integrated, you can create sophisticated workflows that automate your follow-ups, engagement tracking, and lead nurturing.
This saves you time and ensures a consistent and personalized experience for your audience.
Watch our video tutorial on automated workflows:
Adding Contacts to Workflows Before the Webinar Starts
To maximize attendance and ensure everyone is well-prepared, you can add registrants to a workflow shortly before the webinar begins. This workflow can send last-minute reminders and essential information.
Here’s how to set it up:
- Log into your AEvent account and open the timeline for your upcoming webinar.
- Click on “Create Action” and choose to add contacts to a workflow.
- Set this action to trigger 15 minutes before the webinar starts.
- Select the registrants and choose the appropriate HubSpot workflow.
- Confirm and save the action.
Removing Contacts From Workflows Post-Webinar
After the webinar, you’ll want to update your workflows to reflect attendee status. This involves removing attendees from the pre-webinar workflow and possibly adding them to a follow-up sequence.
Here’s the process:
- Go back to the webinar timeline in your AEvent account.
- Create a new action to remove contacts from a workflow.
- Set this action to trigger one hour after the webinar ends.
- Select the attendees and choose the workflow from which you want them removed.
- Confirm and save the action.
Use Cases for Automating Workflows

Automating your workflows with HubSpot and AEvent creates a more engaging and personalized experience for your attendees. This leads to higher satisfaction, better engagement, and ultimately, more successful webinars.
Here are a few situations where you can benefit from automated webinar workflows:
- Automated Follow-Ups: To boost attendance rates, add registrants to a workflow 15 minutes before the webinar starts. This workflow can send out last-minute reminders, ensuring that your audience doesn’t forget about the event and has all the information they need to join.
- Engagement Tracking: Automatically add attendees to a post-webinar follow-up sequence. This can include sending additional resources, gathering feedback through surveys, or providing special offers based on the webinar content. It keeps the engagement going and shows your attendees that you value their participation.
- Lead Nurturing: Remove non-attendees from the primary workflow and add them to a nurturing campaign. This workflow can be tailored to re-engage these individuals, encouraging them to attend future events or consume other relevant content. It’s a great way to turn missed opportunities into future successes.
- Segmentation and Personalization: Utilize custom fields and data collected during the webinar to segment your audience for personalized marketing efforts. By understanding their behavior and preferences, you can create targeted workflows that deliver the right content to the right people at the right time.
- Performance Analysis: Track which marketing channels are driving the most webinar registrations and attendance. Use this data to refine your marketing strategies, focusing on the channels that deliver the best results. Automated workflows can help in gathering and analyzing this data efficiently.
Utilizing On-Registration Triggers
On-registration triggers ensure that every new registrant is immediately integrated into your marketing and engagement workflows, providing a seamless experience from the moment they sign up.
Check out our video tutorial on how you can easily set up on-registration triggers:
- Adding registrants to specific lists: As soon as someone registers for your webinar, you can automatically add them to a specific contact list in HubSpot. This allows you to manage and segment your audience effectively right from the start.
- Adding registrants to workflows upon registration: In addition to adding registrants to lists, you can also enroll them in pre-defined workflows. This ensures they receive timely and relevant communications leading up to the webinar, enhancing their experience and increasing the likelihood of attendance.
Use Cases for Utilizing On-Registration Triggers

Here are a couple of use cases for webinar management where on-registration triggers can streamline and enhance your processes:
- Automated Welcome Emails: Immediately send personalized welcome emails to new registrants, providing them with webinar details and any pre-event materials. This helps set expectations and ensures your audience is well-prepared, right from the get-go.
- Instant Lead Qualification: Add registrants to a specific list in HubSpot, allowing your sales team to quickly identify and reach out to high-priority leads. By qualifying leads as they register, you can ensure that your sales efforts are focused on the most promising prospects.
- Custom Follow-Up Workflows: Automatically enroll registrants into a pre-defined workflow that nurtures them with relevant content leading up to the webinar. This can include reminders, additional resources, and personalized messages to keep them engaged and informed.
- Data Sync for Analytics: Ensure that registration data is automatically synced with HubSpot for real-time analytics and reporting. This helps you measure the effectiveness of your marketing campaigns and make data-driven decisions to improve future events.
- Targeted Marketing Campaigns: Use the integration to segment registrants based on custom fields and trigger specific marketing campaigns tailored to their interests and behavior. This level of personalization can significantly enhance engagement and conversion rates.
Advanced Tips and Best Practices
To get the most out of your HubSpot and AEvent integration, it’s essential to follow some advanced tips and best practices. These will help you ensure data accuracy, leverage analytics for continuous improvement, and stay on top of new features and support options.
Regularly Test Integrations and Workflows
It’s crucial to regularly test your integrations and workflows to ensure everything is running smoothly. This helps you catch any issues early and fix them before they impact your webinar management.
Schedule periodic tests to verify that data is being accurately transferred between HubSpot and AEvent and that all automated actions are functioning as intended.
Keep Contact Lists and Workflows Up-To-Date
Outdated contact lists and workflows can lead to ineffective communication and missed opportunities. Regularly review and update your lists and workflows to reflect the most current and relevant information.
This includes removing inactive contacts, updating email sequences, and ensuring all data fields are accurately populated.
Use HubSpot’s Analytics Tools to Measure Webinar Success
HubSpot offers powerful analytics tools that can provide deep insights into your webinar performance. Use these tools to track key metrics such as registration numbers, attendance rates, engagement levels, and conversion rates.
By analyzing this data, you can gain a better understanding of what’s working and where there’s room for improvement.
Adjust Strategies Based on Data Insights
Data-driven decision-making is key to continuous improvement. Use the insights gained from your analytics to adjust your marketing and engagement strategies.
This might involve tweaking your email sequences, experimenting with different types of content, or shifting your promotional efforts to more effective channels.
Cinch Your Webinar Success with HubSpot and AEvent Integration
Achieving webinar success has never been easier. By integrating HubSpot with AEvent, you can streamline your processes, automate key tasks, and gain valuable insights to continuously improve your events.
This powerful combination ensures that your webinars run smoothly and effectively, driving engagement and delivering results.
Ready to take your webinars to the next level? Start your journey with HubSpot and AEvent today!
Book a demo with AEvent and start hosting impactful and high-converting webinars!